
Food, Entertainment, and Arts

Tuesday, March 31, 2015
Sunday, March 29, 2015
101 Things I Love about Portland Maine


The Bull and Claw on Route One in Wells:
Lounge, fireplace, salad and soup bar, and a big heap of delicious fried clams in crumbs!
Thursday, March 26, 2015
Grout Alternatives
9 Ways to Never Grout Again
Grout’s a high-maintenance, dirt-and-mold catching drag. Here are 9 clever ways to avoid it.
 Why mess with grout if you don't have to? We have nine good-looking ways to go without in the bathroom, kitchen, and beyond. Images: Praxis Design-Build / Stevee Curtis / HandyDeck Systems Inc.
1. Snappy Patio
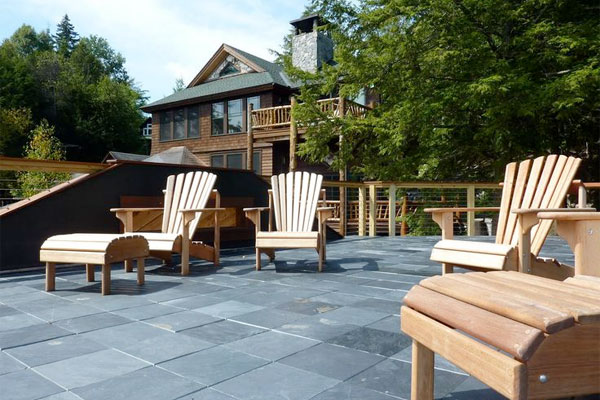 Image: HandyDeck Systems Inc.
 Setting real stone tiles in mortar or sand is mind-crunching work. These outdoor tiles are backed with plastic grids with interlocking tabs that simply snap together. Best of all: no grout to repair or refill. Turn your deck into a patio — they’ll cover any level surface. DIY-friendly, groutless stone tiles are about $12 per square foot.
2. Groutless & Green
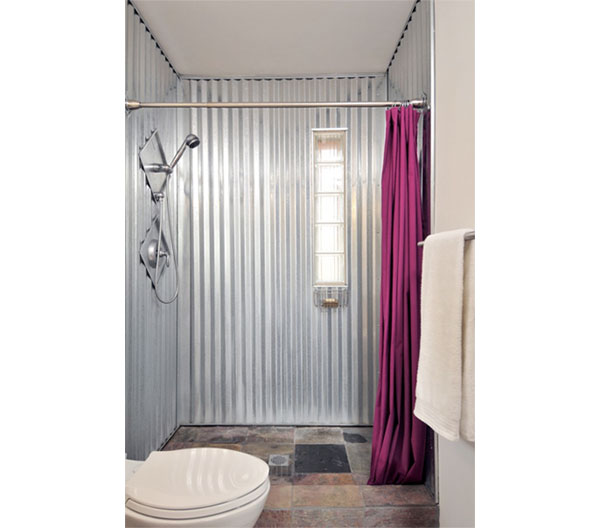 Image: Praxis Design-Build, John McDonough, project superintendent / Laurie Allegretti, photo
Corrugated, galvanized steel roofing panels make nearly seamless shower walls for this house in New Mexico. They’re held in place with trim pieces so there are no nails. Before the panels were installed, the walls were completely waterproofed with cement tile backer board and an acrylic sealer. The panels are cheap — $12 to $15 for a 2-foot-by-8-foot panel — and recyclable, making them a green choice that can help projects qualify for LEED certification.
3. Faux Grout
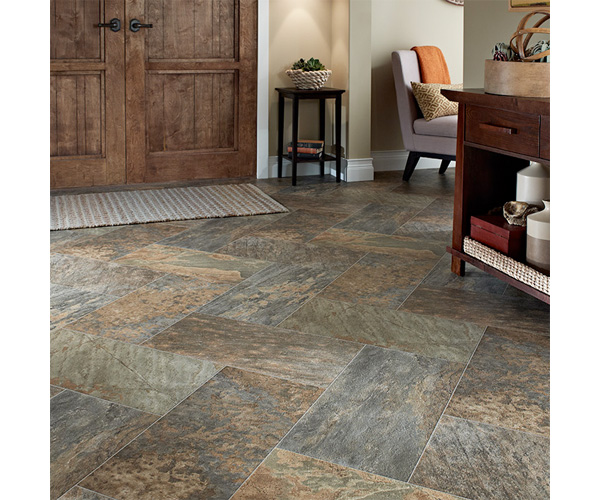 Image: Mannington Residential Flooring
Sheet vinyl is getting better and better at reproducing the look of real stone tiles, complete with (fake) grout lines that you’ll never have to seal or repair. Premium sheet vinyl with a cushioned backing and 20-year warranty is about $3 per square foot.
4. Getting Plastered
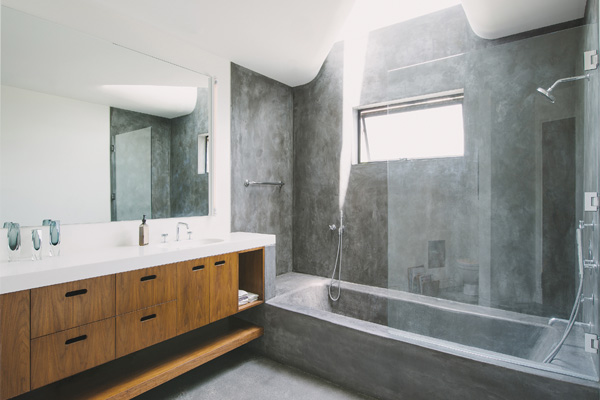 Image: Alen Lin / Courtesy of Beth Holden of New Theme Inc., Los Angeles
Good old plaster over a wood-and-wire-mesh frame creates this seamless bath enclosure. A powdered colorant added prior to mixing the plaster makes a mottled look; a waterproof sealant finishes the job. Plastering is $3 to $5 per square foot.
5. Diamond Life
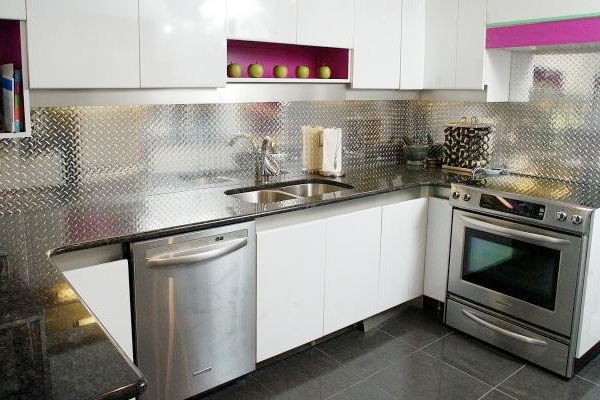 Image: Ridalco
We love imaginative backsplashes but hate cleaning grout. To the rescue: Aluminum diamond plate metal adds modern pizzazz to your kitchen and is virtually seamless. Fix it in place with construction adhesive, then easily wipe off cooking grease and splatters. A 1-foot-by-8-foot panel of 1/16-inch-thick (.063) aluminum diamond plate is about $45.
Related: 12 Kitchen Backsplash Ideas to Fit Any Budget
6. Skin-Deep Beauty
 Image: Forzastone
Thin veneers of real stone laminated to layers of metal alloys and plastic make for eye-candy panels that are waterproof and virtually seamless. They’re 85% lighter than stone slabs typically used for shower enclosures, but the beauty is all real.
7. Pattern Under Glass
 Image: Stevee Curtis
Blogger Stevee at JSquared put a piece of fabric behind her stovetop and covered it with a piece of clear, easy-to-clean glass. When she needs to change the vibe, she switches out the fabric. Off-the-shelf 3/32-inch-thick glass is $12 to $15 for a 36-inch-by-24-inch piece.
8. Do You Tadelakt?
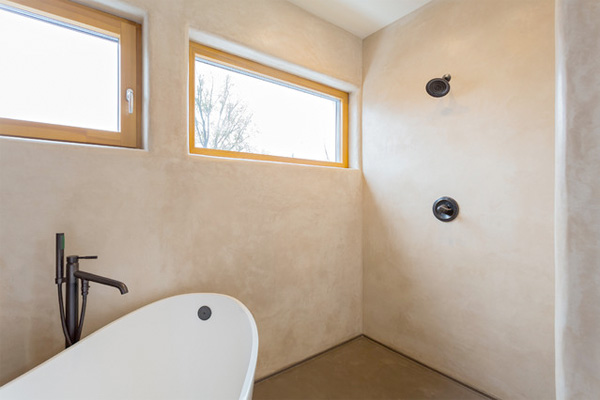 Image: Ryan Chivers of Artesano Plaster
A centuries-old Moroccan plastering process called tadelakt is finished with olive oil soap that’s hand rubbed to a soft luster using a special stone. The result is a smooth, seamless surface that’s so waterproof it can be used for shower walls. Cost of the process is about $50 per square foot.
9. Magnetic Personality
 Image: Dana Pugh of Tattered Style
Tattered Style blogger Dana wanted an easy-to-use memorabilia wall in her hallway. Her low-cost solution was a one-piece steel panel where she can use magnets to hang ever-changing photos and trinkets. The panel was cut to order by a local metal shop, and the sharp edges were folded over (wrapped) for safety. Dana attached the panel to wall studs using sheet metal screws.
Image: Praxis Design-Build, John McDonough, project superintendent / Laurie Allegretti, photoCorrugated, galvanized steel roofing panels make nearly seamless shower walls for this house in New Mexico. They’re held in place with trim pieces so there are no nails. Before the panels were installed, the walls were completely waterproofed with cement tile backer board and an acrylic sealer. The panels are cheap — $12 to $15 for a 2-foot-by-8-foot panel — and recyclable, making them a green choice that can help projects qualify for LEED certification.
3. Faux Grout
Image: Mannington Residential Flooring Sheet vinyl is getting better and better at reproducing the look of real stone tiles, complete with (fake) grout lines that you’ll never have to seal or repair. Premium sheet vinyl with a cushioned backing and 20-year warranty is about $3 per square foot.
4. Getting Plastered
Image: Alen Lin / Courtesy of Beth Holden of New Theme Inc., Los Angeles Good old plaster over a wood-and-wire-mesh frame creates this seamless bath enclosure. A powdered colorant added prior to mixing the plaster makes a mottled look; a waterproof sealant finishes the job. Plastering is $3 to $5 per square foot.
5. Diamond Life
Image: Ridalco We love imaginative backsplashes but hate cleaning grout. To the rescue: Aluminum diamond plate metal adds modern pizzazz to your kitchen and is virtually seamless. Fix it in place with construction adhesive, then easily wipe off cooking grease and splatters. A 1-foot-by-8-foot panel of 1/16-inch-thick (.063) aluminum diamond plate is about $45.
Related: 12 Kitchen Backsplash Ideas to Fit Any Budget
6. Skin-Deep Beauty
Image: Forzastone Thin veneers of real stone laminated to layers of metal alloys and plastic make for eye-candy panels that are waterproof and virtually seamless. They’re 85% lighter than stone slabs typically used for shower enclosures, but the beauty is all real.
7. Pattern Under Glass
Image: Stevee Curtis Blogger Stevee at JSquared put a piece of fabric behind her stovetop and covered it with a piece of clear, easy-to-clean glass. When she needs to change the vibe, she switches out the fabric. Off-the-shelf 3/32-inch-thick glass is $12 to $15 for a 36-inch-by-24-inch piece.
8. Do You Tadelakt?
Image: Ryan Chivers of Artesano Plaster A centuries-old Moroccan plastering process called tadelakt is finished with olive oil soap that’s hand rubbed to a soft luster using a special stone. The result is a smooth, seamless surface that’s so waterproof it can be used for shower walls. Cost of the process is about $50 per square foot.
9. Magnetic Personality
Image: Dana Pugh of Tattered Style Tattered Style blogger Dana wanted an easy-to-use memorabilia wall in her hallway. Her low-cost solution was a one-piece steel panel where she can use magnets to hang ever-changing photos and trinkets. The panel was cut to order by a local metal shop, and the sharp edges were folded over (wrapped) for safety. Dana attached the panel to wall studs using sheet metal screws.
 John Riha has written seven books on home improvement and hundreds of articles on home-related topics. He’s been a residential builder, the editorial director of the Black & Decker Home Improvement Library, and the executive editor of Better Homes and Gardens magazine. Follow John on Google+.
Read more: http://www.houselogic.com/home-advice/maintenance-repair/groutless-tile/#ixzz3VW3rkMr0
Follow us: @HouseLogic on Twitter | HouseLogic on Facebook
Tuesday, March 17, 2015

Thursday, March 12, 2015
101 Things I Love about Portland Maine


JP's on outer Woodford Street in Portland:
Delicious cocktails, smashing hors d'oeuvres, and yummy desserts!!
Wednesday, March 11, 2015


Monday, March 9, 2015
101 Things I Love about Portland Maine
I


Stockhouse Restaurant and Paint Nite:
Perfect combo of fun, food, and drinks!
101 Things I Love about Portland Maine
DaVinci's Italian restaurant in Lewiston mills~~Fabulous lunch buffet for $10.95 with soups, salad bar and nice variety of pizza slices! Their yeasty rolls are yummy!


Saturday, March 7, 2015
101 Things I Love about Portland Maine


TIQA--new bar and restaurant on Commercial St. in the Marriott: relaxing bar area with couches and easy chairs and lots of delicious Mediterranean fare.

Friday, March 6, 2015
What Not to Do as a New Homeowner
What Not to Do as a New Homeowner
If you’re new to homeownership, you’ll definitely want to avoid these easy-to-prevent mistakes that could cost you big time.
 Before you start working on your curb appeal, give 811 a call. The hotline will send out folks from your local utilities to mark underground pipes, cables, and wires so you don't sink your shovel into something dangerous. Image: Stefanie Hollmichel
We know so well the thrill of owning your own house — but don’t let the excitement cause you to overlook the basics. We’ve gathered up a half dozen classic boo-boos new homeowners often commit — and give you some insight on why each is critically important to avoid.
1. Not Knowing Where the Main Water Shutoff Valve Is
Water from a burst or broken plumbing pipe can spew dozens of gallons into your home’s interior in a matter of minutes, soaking everything in sight — including drywall, flooring, and valuables. In fact, water damage is one of the most common of all household insurance claims.
Quick-twitch reaction is needed to stave off a major bummer. Before disaster hits, find your water shutoff valve, which will be located where a water main enters your house. Make sure everyone knows where it’s located and how to close the valve. A little penetrating oil on the valve stem makes sure it’ll work when you need it to.
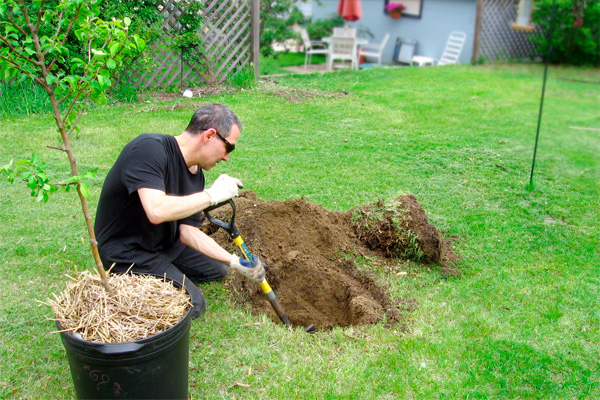
2. Not Calling 811 Before Digging a Hole
Ah, spring! You’re so ready to dig into your new yard and plant bushes and build that fence. But don’t — not until you’ve dialed 811, the national dig-safely hotline. The hotline will contact all your local utilities who will then come to your property — often within a day — to mark the location of underground pipes, cables, and wires.
This free service keeps you safe and helps avoid costly repairs. In many states, calling 811 is the law, so you’ll also avoid fines.
3. Not Checking the Slope of Foundation Soil
The ground around your foundation should slope away from your house at least 6 inches over 10 feet. Why? To make sure that water from rain and melting snow doesn’t soak the soil around your foundation walls, building up pressure that can cause leaks and crack your foundation, leading to mega-expensive repairs.
This kind of water damage doesn’t happen overnight — it’s accumulative — so the sooner you get after it, the better (and smarter) you’ll be. While you’re at it, make sure downspouts extend at least 5 feet away from your house.
Related: How to Prevent Water Damage
4. Not Knowing the Depth of Attic Insulation
This goes hand-in-hand with not knowing where your attic access is located, so let’s start there. Find the ceiling hatch, typically a square area framed with molding in a hallway or closet ceiling. Push the hatch cover straight up. Get a ladder and check out the depth of the insulation. If you can see the tops of joists, you definitely don’t have enough.
The recommended insulation for most attics is about R-38 or 10 to 14 inches deep, depending on the type of insulation you choose. BTW, is your hatch insulated, too? Use 4-inch-thick foam board glued to the top.
Related: Attic Air Leaks: How to Find and Seal Them
5. Carelessly Drilling into Walls
Hanging shelves, closet systems, and artwork means drilling into your walls — but do you know what’s back there? Hidden inside your walls are plumbing pipes, ductwork, wires, and cables.
You can check for some stuff with a stud sensor — a $25 battery-operated tool that detects changes in density to sniff out studs, cables, and ducts.
But stud sensors aren’t foolproof. Protect yourself by drilling only 1¼ inches deep max — enough to clear drywall and plaster but not deep enough to reach most wires and pipes.
Household wiring runs horizontally from outlet to outlet about 8 inches to 2 feet from the floor, so that’s a no-drill zone. Stay clear of vertical locations above and below wall switches — wiring runs along studs to reach switches.
6. Cutting Down a Tree
The risk isn’t worth it. Even small trees can fall awkwardly, damaging your house, property, or your neighbor’s property. In some locales, you have to obtain a permit first. Cutting down a tree is an art that’s best left to a professional tree service.
Plus, trees help preserve property values and provide shade that cuts energy bills. So think twice before going all Paul Bunyan.
Related: 11 Trees You Should Never Plant in Your Yard
Water from a burst or broken plumbing pipe can spew dozens of gallons into your home’s interior in a matter of minutes, soaking everything in sight — including drywall, flooring, and valuables. In fact, water damage is one of the most common of all household insurance claims.
Quick-twitch reaction is needed to stave off a major bummer. Before disaster hits, find your water shutoff valve, which will be located where a water main enters your house. Make sure everyone knows where it’s located and how to close the valve. A little penetrating oil on the valve stem makes sure it’ll work when you need it to.
2. Not Calling 811 Before Digging a Hole
Ah, spring! You’re so ready to dig into your new yard and plant bushes and build that fence. But don’t — not until you’ve dialed 811, the national dig-safely hotline. The hotline will contact all your local utilities who will then come to your property — often within a day — to mark the location of underground pipes, cables, and wires.
This free service keeps you safe and helps avoid costly repairs. In many states, calling 811 is the law, so you’ll also avoid fines.
3. Not Checking the Slope of Foundation Soil
The ground around your foundation should slope away from your house at least 6 inches over 10 feet. Why? To make sure that water from rain and melting snow doesn’t soak the soil around your foundation walls, building up pressure that can cause leaks and crack your foundation, leading to mega-expensive repairs.
This kind of water damage doesn’t happen overnight — it’s accumulative — so the sooner you get after it, the better (and smarter) you’ll be. While you’re at it, make sure downspouts extend at least 5 feet away from your house.
Related: How to Prevent Water Damage
4. Not Knowing the Depth of Attic Insulation
This goes hand-in-hand with not knowing where your attic access is located, so let’s start there. Find the ceiling hatch, typically a square area framed with molding in a hallway or closet ceiling. Push the hatch cover straight up. Get a ladder and check out the depth of the insulation. If you can see the tops of joists, you definitely don’t have enough.
The recommended insulation for most attics is about R-38 or 10 to 14 inches deep, depending on the type of insulation you choose. BTW, is your hatch insulated, too? Use 4-inch-thick foam board glued to the top.
Related: Attic Air Leaks: How to Find and Seal Them
5. Carelessly Drilling into Walls
Hanging shelves, closet systems, and artwork means drilling into your walls — but do you know what’s back there? Hidden inside your walls are plumbing pipes, ductwork, wires, and cables.
You can check for some stuff with a stud sensor — a $25 battery-operated tool that detects changes in density to sniff out studs, cables, and ducts.
But stud sensors aren’t foolproof. Protect yourself by drilling only 1¼ inches deep max — enough to clear drywall and plaster but not deep enough to reach most wires and pipes.
Household wiring runs horizontally from outlet to outlet about 8 inches to 2 feet from the floor, so that’s a no-drill zone. Stay clear of vertical locations above and below wall switches — wiring runs along studs to reach switches.
6. Cutting Down a Tree
The risk isn’t worth it. Even small trees can fall awkwardly, damaging your house, property, or your neighbor’s property. In some locales, you have to obtain a permit first. Cutting down a tree is an art that’s best left to a professional tree service.
Plus, trees help preserve property values and provide shade that cuts energy bills. So think twice before going all Paul Bunyan.
Related: 11 Trees You Should Never Plant in Your Yard
John Riha has written seven books on home improvement and hundreds of articles on home-related topics. He’s been a residential builder, the editorial director of the Black & Decker Home Improvement Library, and the executive editor of Better Homes and Gardens magazine. Follow John on Google+.Read more: http://www.houselogic.com/home-advice/repair-tips/what-new-homeowners-need-to-know/#ixzz3TfHmbuv9
Follow us: @HouseLogic on Twitter | HouseLogic on Facebook


101 Things I Love about Portland Maine
Lolita's -- enjoy small to large plates and scrumptious appetizers in an intimate cozy setting on Munjoy Hill!


Wednesday, March 4, 2015

Pulls and Knobs Open the Door to a New Look
Pulls and Knobs Open the Door to a New Look
Repair and replace door hardware that makes rooms look dingy and outdated. We’ll show you how door and cabinet pulls, knobs, and hinges can give your home new sparkle.
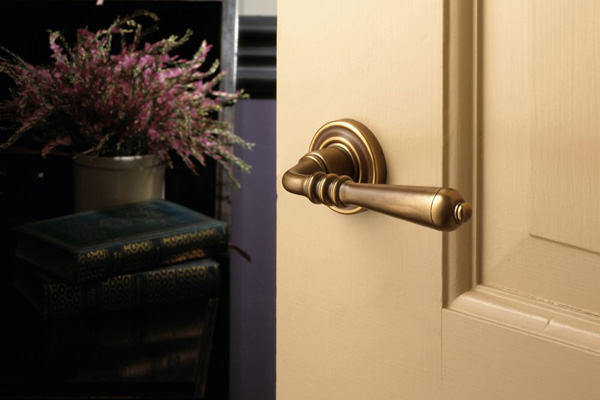 If you're switching from knobs to levers, be sure to buy a lever handle lockset made by the same manufacturer as the knob you're replacing. Image: Baldwin Hardware
You can slam cabinet and bedroom doors only so many times before you have to repair and replace hardware that is loose, broken, or just plain old and tired. It doesn’t take a lot of time or money to tighten loose hardware, clean globs of paint off a hinge, or replace cabinet pulls to brighten any room in the house.
Repair and Replace Kitchen Cabinet Hardware
Replacing or repairing knobs and pulls on cabinets and drawers is a quick way to give your old kitchen a new look.
Cabinet hardware can be simple or ornate, and ranges from $1 a knob to $45 or more. Here’s your game plan:
Nothing ages a room like a loose doorknob. You can tighten mortise-style doorknobs by simply tightening the setscrew on the side of the doorknob. For cylindrical doorknobs, you’ll need to take the doorknob apart.
Replace dated doorknobs with sleek door levers. For easiest installation, choose a lever handle lockset made by the same manufacturer. Prices range from $20 to $160.
Buy a commercial polish, such as Wright’s or Weiman, to make brass doorknobs shine. Warm water and a little dish soap or a homemade paste of equal parts vinegar and baking soda will scrub off dirt and make stainless steel and glass doorknobs sparkle.
Clean or Replace Door Hinges
Telltale paint on door hinges says someone did a sloppy job. To restore hinges, try these techniques:
Replacing or repairing knobs and pulls on cabinets and drawers is a quick way to give your old kitchen a new look.
Cabinet hardware can be simple or ornate, and ranges from $1 a knob to $45 or more. Here’s your game plan:
- Repair loose knobs and pulls by tightening holding screws, replacing stripped screws, or plugging gaps with wood filler applied with a putty knife.
- Count the number of knobs or pulls you need before you head to the hardware store. Estimating will cost you time and money.
- To replace pulls, which are attached to cabinets by a screw at each end, measure the distance between holes — not the length of pulls — to assure a perfect fit.
- If you’re switching from a two-hole pull to a one-hole knob, choose hardware with back plates that cover door scratches and holes.
Nothing ages a room like a loose doorknob. You can tighten mortise-style doorknobs by simply tightening the setscrew on the side of the doorknob. For cylindrical doorknobs, you’ll need to take the doorknob apart.
Replace dated doorknobs with sleek door levers. For easiest installation, choose a lever handle lockset made by the same manufacturer. Prices range from $20 to $160.
Buy a commercial polish, such as Wright’s or Weiman, to make brass doorknobs shine. Warm water and a little dish soap or a homemade paste of equal parts vinegar and baking soda will scrub off dirt and make stainless steel and glass doorknobs sparkle.
Clean or Replace Door Hinges
Telltale paint on door hinges says someone did a sloppy job. To restore hinges, try these techniques:
- Wash with sudsy hot water.
- Scrub with a nylon brush or a toothbrush. A wire brush could damage the finish.
- Brush on paint stripper that is safe for all surfaces.
- Polish with beeswax furniture polish or brass polish.
101 Things I Love about Portland Maine
ASIA Chinese restaurant in Mill Creek has a very nice buffet at lunch with good variety of dishes from soup and appetizers to main courses!


Subscribe to:
Comments (Atom)